Okay, so I have most of materials for this table now, and I started the basic construction of it yesterday. It's going to be loosely themed around Prospero, so I am going with a kind of modern Cairo look to it, with some magical doodads around every here and there. It's going to be ruined to fit in with right after the Space Puppies bombed the shit out of the place. I figured I would do this as a step by step process for all of you faithful readers to follow along with!
So, to start, here is the basics of what I am building with:
1 piece of Particle Board, cut to 6ft x 4ft
4 pieces of pink insulating foam, each at 4ft x 2ft
1 6ft folding table
4 big bottles of wood glue (so far....)
1 big old tub of Spackle
1 pre-made stone mosaic, 1ft x 1ft
god awful amounts of Woodland Scenic's "Buff" Ballast, both medium and fine grade.
random scatterings of terrain that I have come across in my travels
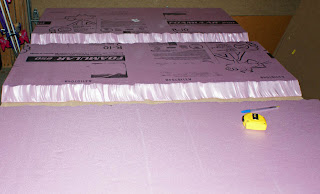
So those are the basic materials. As this progresses, there will of course be more. Anyways, on to step 1!!!! First, I placed the board onto the table, and lined up 3 pieces of the 4ft x 2ft foam to insure they fit properly. I am creating two canals running along the board, so the next thing I had to do was to cut the foam to create them! Here is a diagram of how I cut them, using my ever impressive Microsoft Paint skills!
As is CLEARLY demonstrated here, I cut measured and then cut at an angle with 3 inches off the top, and 1 inch off the bottom. This will give me a 2 inch wide flat spot between boards, as well as a 6 inch open spot across the actual top of the board (advantage for skimmers, jump infantry, and sucks to every one else's asmar!) When it is all cut and place, it looks like this:
After this, I was fine with how the canals were shaped, so I then had to go about securing the foam to the wood. This was done first with a sloppy layer of wood glue on the bottom, followed by six 2.5 inch screws per piece of foam. I also secured the Mosaic in the exact center of the board, so it now looks like this:
Here's a close up of a screw. You really need to measure your table so that it goes through the foam and into the wood, but your probably don't want it coming out the bottom either. 2.5 inch screws worked perfectly for me since from top to bottom my table is 2.75 inches. The scuffing on the edges is where I took a heavy duty wire brush as brushed away the sharp edges that formed as a result of using a hot foam cutting knife. Things in nature rarely have sharp edges, so I followed suit.
After all of this is done, it's time to protect the board. Spray paint will literally eat through foam, so you need to protect the foam with a sealant of some kind. I used a mix of wood glue and water (mostly wood glue though, hehe), and it worked great. Here's a pic of that while it's still wet.
I used a putty scraping tool to make sure that I got it on there without any oddly shaped puddles, which is actually important because you want a flat surface to work with from here on out. Even if you build the table up with hills and everything, it's easiest if you have a flat base to work with. I'll be adding my terrain as I go, but since I am using Ballast and not paint for the base of the table, I'm going to have to paint my terrain before I secure it to the table! Anyways, back on topic, the next step I did was to add Spackle all along the sides and bottoms of the canals. This gives it a more earthy texture than the smooth one you get from the hot knife.
I just applied it using my hands, and I made sure to fill in the gaps along the bottom so that when I use water effect at the very end, it doesn't just all run underneath the table. After this dried, which I gave about 4 hours, I decided it was time to use some spray paints! I wanted the sides to be black to hide the pink foam look, and the canals I sprayed white since I will actually be painting these a color to match the ballast that will be going on top. I plan to put a small amount of ballast over the paint, but it's not fun trying to get it to stick to angles, so I am trying to minimize that.
So right about now I am going to put away some clean laundry while that drys fully, and hopefully by tonight I can get the canals painted. While taking breaks from all of this, however, I have been working on some terrain for the board as well. Here is some Arcane Ruins that will be going on tomorrow!
So that's where I stand after working today. This table is coming along very quickly, and I'm hoping to get it at least half way acceptable by this weekend so we can get some Beerhammer 40k going on in my garage. I haven't played that in many moons, and I need a good drinking session some time soon.


No comments:
Post a Comment